I was wondering if it would be difficult to create a list of fan control profiles which one could easily switch from via taskbar or even better a dedicated shortcuts? I am constantly switching between work mode, when I know complete silence of the laptop is nearly impossible and idle mode, when I browse stuff, do paperwork and know that the CPU won't reach 70-80°C.
You are using an out of date browser. It may not display this or other websites correctly.
You should upgrade or use an alternative browser.
You should upgrade or use an alternative browser.
Fan control profiles
- Thread starter qord
- Start date
m_montagne
Member
I have just installed a Noctua NH-C14S CPU cooler in a Dell Inspiron 5680.
Our machine features an Intel i7-8700 6-core CPU. With the stock Intel CPU fan and aluminum finned heat sink, we had temperature spikes as high as 212 degrees F in sometimes several cores, and sustained temperatures of up to 195 degrees F under 15-minute 100% CPU stress tests.
I believe a well-reasoned approach to configuring just one set of "Custom Auto" fan parameters will produce the kind of behavior you might presume require multiple configurations:
1. When I first tinkered with the Manual fan parameters, I was a bit befuddled to find that my PWM Noctua CPU fan could only be set at three speeds... a) 0 at the left end of the slider, b) the mid-point of the slider, and c) the right terminus of the slider. I am not sure that there is some hardware or other limitation which precludes running my PWM case and CPU fans at other speeds, but at one point, I found the far left setting actually resulted (in respect to whatever other conditions) in turning my CPU fan off. So be careful. You don't want to be running very long in that condition. I had the side of my case off the whole while, and was ducking under the desk at the time with a stethoscope to identify which (ambiguously labeled HWiNFO-identified) fan was which. On my system, the first listed (Fan 1) turned out to be the CPU fan; the second (Fan 2) turns out to be the case fan... but I wouldn't assume the same applies to every system without knowing that this order is the intention of HWiNFO engineers.
2. Once I had the fan nomenclature sorted out by experimenting with manual settings for each fan and listening for which fan ramped up or down, I used the manual fan speed configuration to turn my CPU fan up all the way. This resulted in a fan speed of approximately 1,250 RPM, whereas the original pre-HWiNFO64 speed was approximately a mere 314 RPM. My high temperatures with the Noctua CPU cooler were a result of virtually no air passing thru the Noctua ratiator at 314 RPM. So we can understand the very poor performance of the installation (just maybe 10 degrees cooler than the stock Intel cooler)... and the imperative need for fan-speed-controlling software.
Without HWiNFO64 (with the un-regulated Noctua fan running at a mere 314 RPM under unadulterated Dell hardware), Dell's 15-minute 100% CPU stress test produced 184-degree F temperatures. With an HWiNFO-regulated maximum Noctua fan speed (which for the C14S fan is 1,250 RPM), this maximum temperature was reduced to a relatively amazingly low maximum of just 126 degrees. For most of the test, temperatures were no more than a mere 118-124 degrees.
But the CPU fan was excessively loud, as well... and we have another possible fan speed to factor into a possible HWiNFO64 Custom Auto configuration that we haven't even played with yet.
3. So I put together a quick spreadsheet in which to calculate/plot a transformation or ramp-up point for my mere 3 possible fan speeds (the first of which is either off or so low that it is not serviceable). Ultimately I found that the situation we're resolving is so simple that you don't need to do this if your PWM fan likewise will only operate at 2 serviceable speeds. Why? Because you simply want to ramp fan speed from the lower speed (what you probably believe is suffiently quiet) to the higher speed (which minimizes the upper temperatures your CPU can reach).
In regard to this intention, there's a bit of confusion introduced by the numbers which HWiNFO presents as "RPM" in its "Custom Auto" configuration window: For the Noctua C14S, the only allowed spinning fan speed entries are 2,469 and 3,993 "RPM" respectively. These actually result in what I believe are (later) accurately expressed in the Sensor Status window (under Dell 5680, "other docking," for the both) as generally approximately some 600+ RPM and 1,250 RPM respectively. But HWiNFO forces you to indicate these mere two accommodated spin rates by the numbers you get from the sliders in the preceding HWiNFO Fan Control window. So I assume the reasonable process for ascertaining the proper values to enter in the Custom Auto window is to play with the sliders to ascertain whatever few or many points the Fan Control window wants to orient to. My slider for the Noctua installation wants to stop only at the mid and endpoints, but it can be set elsewhere (without resulting in intermediate speeds). In any case, the proper input values for each potential spin rate are indicated in a box there, if and when, as in my case at least, the HWiNFO slider feels at home at whatever points the application wants you to set fan speed(s) to. I have no idea if your experience will be the same.
So for my circumstances, resolution of these issues was simple:
The Fan Control Look-up Table you invoke from the Custom Auto button for your CPU fan has 6 potential temperature values for each of two potential temperature sources (these are 0, 40, 50, 60, 70, and 80 degrees C respectively). Being a software engineer, and intuiting that it might not be necessary (or appropriate always) for a configuration to relate to both of two separate temperature sensors, I tested an initial configuration using only one temperature source, and made that the CPU Package. As expected, I found that the conditional processes was indeed governed by the intended temperature monitors... and this has worked perfectly well since (as attached images illustrate).
Seeing that the higher of the two speeds HWiNFO will run my Noctua fan at prevented 100% CPU stress from exceeding 126 degrees F... and mostly kept those temperatures to as little as 117-118 degrees F; I decided to try a ramp-up trigger speed for some 5 degrees F less than the bottom-end number (117-118) — in part to allow for spin-up delays to avert exceeding hopefully not much more than the previous 126-degree maximum suffered under 100% stress. I then ran the 15-minute 100% stress test as before, and felt a little bit stupid to be mildly surprised that again, my CPU temperatures never exceeded 126 degrees. This was of course a phenomenal improvement over the pre-HWiNFO behavior of this system (which even with the gargantuan Noctua cooler suffered spikes to 185 degrees without an ability to ramp up fan speeds).
So the key to getting the behavior I believe you want from separate configurations is in fact indigenous to one proper configuration, which (only under the greatest stress) ramps up fan speed to whatever rate you desire to preclude whatever excessive temperatures you desire to avert. I would likewise experiment with manual settings therefore to find what fan speed you want tolerate for what temperatures you want to tolerate. Being as the cooler is the better here, I would likewise manually set fan speed to maximum and run a stress test to find the lower end of resultant temperatures under long-term stress. Set a ramp-up temperature something like 5 degrees less than this lower end. Accounting for ramp-up delays, you might subtract 5 degrees from the lower end of this upper temperature range you want to restrict your system to, and set that temperature to ramp up to the highest fan speed you intend to tolerate. Below that point (especially if you only have 2 possible fan speeds, as I do)... set fan speed to whatever RPMs and respective noise you can tolerate for the work you do which produces the more tolerable temperature in those ranges (which require possibly much less cooling).
As you see in the accompanying Fan Control Look-up Table window (screen capture) I have posted, I subtracted 5 degrees F from the 118-degree bottom temperature for 100% CPU load, and made my ramp-up point 113 degrees F (45 degrees C). The "2469" "RPM" settings for the lower temperatures therefore run my CPU cooler fan at the mid-600-RPM range until my CPU Package reaches 113 degrees F... at which point the CPU fan ramps up to some 1,250 RPM in time (to my surprise) again, to prevent temperatures from rising above a mere 126 degrees F, even at 15 minutes of 100% CPU stress. I therefore modified the pre-configured 50-degree C trigger point to 45 degrees C (which is my intended 113-degree F trigger point for ramping fan speed to [in my case] maximum RPMs)
Amazingly, because this cooler is so efficient, the remainder of the time my system runs mostly in the 81-90-degree F range. But your system will likewise dwell in a lower temperature range under the less stressful work you describe. In any case, in that range, like my system, a proper configuration of your system should make your system a relatively quiet system virtually ALL the time it engenders less CPU stress... except only in cases of extreme, relatively long-term stress on a majority of cores. In short therefore, the CPU fan rarely ramps up to high speed; and so, likely, a well conceived Custom Auto fan parameters will also serve you well, by ramping up fans only as necessary to protect your computer from the upper-end temperature ranges you may suffer only in the work you understand already that you have to tolerate higher fan speeds for. In short, you won't (or will only rarely) suffer those speeds and noise in the work you might unnecessarily deploy a separate configuration for... but IF ever you do suffer some rarer exception of higher temperatures in those presumably less CPU-stressful duties... you're still protecting your computer from the dangerous possibility of higher heat.
My system only ramps up to the higher speed briefly during startup. I would expect then that by ascertaining a proper ramp-up point and respective span feeds for temperature ranges on both sides of that ramp-up point, you will get the cooling and behavior you want for every situation from a single configuration.
Attachments


m_montagne
Member
Since the preceding post, I have further reduced CPU temperatures with the Noctua C14S cooler, by decreasing the ramp-up temperature from the previous 40° C to 38° C (approximately 100° F). I ran HWiNFO64 at 30 and 35° C as well, finding that I could eliminate excessive fan noise across most use by tweaking this upward to 38°C, just 2° C below the prior ramp-up point. The difference is rather impressive.
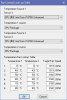
As may be seen in the accompanying images, the Auto Control configuration "Temperature 1" and "Target Fan Speed" settings are now:

In other words, for 0° C, HWiNFO64 runs my CPU fan at what the mid-point of the manual sliders indicates to be 2469 RPM (but which the Sensor Status window reports to vacillate around 690 RPM). At 38° C (setting 2), the configuration ramps the fan up to the maximum RPM reported by the three junctures of the HWiNFO64 sliders (3993 RPM), which the Sensor Status window reports to vacillate up to (but rarely anywhere near) 1250 RPM.
Just this little bit of tweaking has resulted however in impressive benefits: Idle/minimum temperatures are now down into the high 70s F; usual desktop running temperatures are now in the low 80s to low 90s F range; brief spikes arrested by increased fan speed are as much as the low 150s F; and 100% stress of 6 cores for 15 minutes ranges generally from about 115 to 123° F.

I should re-emphasize that the fan behavior may not be exactly what you would expect: What's actually happening is, the tendency for normal operating (desktop) temperatures to reach 100° F causes just an extremely small amount of fan speed ramp-up, with the substantial increase in airflow constantly driving CPU temperatures down into the 85-95° F range. You can barely hear or detect this miniscule ramp-up above the very low, barely audible 690-RPM speed.
Hopefully, these results may influence others to understand how to configure a "Custom Auto" setup that will render ideal cooling for all usage situations.
As may be seen in the accompanying images, the Auto Control configuration "Temperature 1" and "Target Fan Speed" settings are now:
In other words, for 0° C, HWiNFO64 runs my CPU fan at what the mid-point of the manual sliders indicates to be 2469 RPM (but which the Sensor Status window reports to vacillate around 690 RPM). At 38° C (setting 2), the configuration ramps the fan up to the maximum RPM reported by the three junctures of the HWiNFO64 sliders (3993 RPM), which the Sensor Status window reports to vacillate up to (but rarely anywhere near) 1250 RPM.
Just this little bit of tweaking has resulted however in impressive benefits: Idle/minimum temperatures are now down into the high 70s F; usual desktop running temperatures are now in the low 80s to low 90s F range; brief spikes arrested by increased fan speed are as much as the low 150s F; and 100% stress of 6 cores for 15 minutes ranges generally from about 115 to 123° F.
I should re-emphasize that the fan behavior may not be exactly what you would expect: What's actually happening is, the tendency for normal operating (desktop) temperatures to reach 100° F causes just an extremely small amount of fan speed ramp-up, with the substantial increase in airflow constantly driving CPU temperatures down into the 85-95° F range. You can barely hear or detect this miniscule ramp-up above the very low, barely audible 690-RPM speed.
Hopefully, these results may influence others to understand how to configure a "Custom Auto" setup that will render ideal cooling for all usage situations.
Last edited:
doctooowned
New Member
Hi @m_montagne, I found your detailed response very helpful and wonder if you can answer a question or two. I just installed a 3rd party CPU cooler in my Inspiron 5680 and am new to HWinfo64.
So far I have just used Temperature Source 1 for each of my fans (CPU fan, and stock rear case exhaust fan). What is the use/significance of the Temperature Source 2 option? I figured this is a way to have your fan react to temperature readings in two different spots. Say, for example, you have a front case fan to configure. Would you want to set the Temperature Source 1 to the GPU and the Temperature Source 2 to the CPU so that if either the CPU or GPU gets hot this fan goes ahead and ramps up? In a screenshot from your first message I see that you've set CPU (#0): Intel Core i7-8700: Enhanced and CPU Package for both sources and wonder if that made any changes in behavior for you or if you had a specific reason to do so.
I found your 38C ramp up config results to be very interesting and will likely test something similar. I will soon be adding a front case fan and replacing the stock rear case fan, so I'm just hoping I gain a good understanding of these sliders and Fan Control Look-up Table windows so that I can take full advantage of this new hardware.
Similar threads
- Replies
- 2
- Views
- 303
- Replies
- 4
- Views
- 2K
- Replies
- 0
- Views
- 806